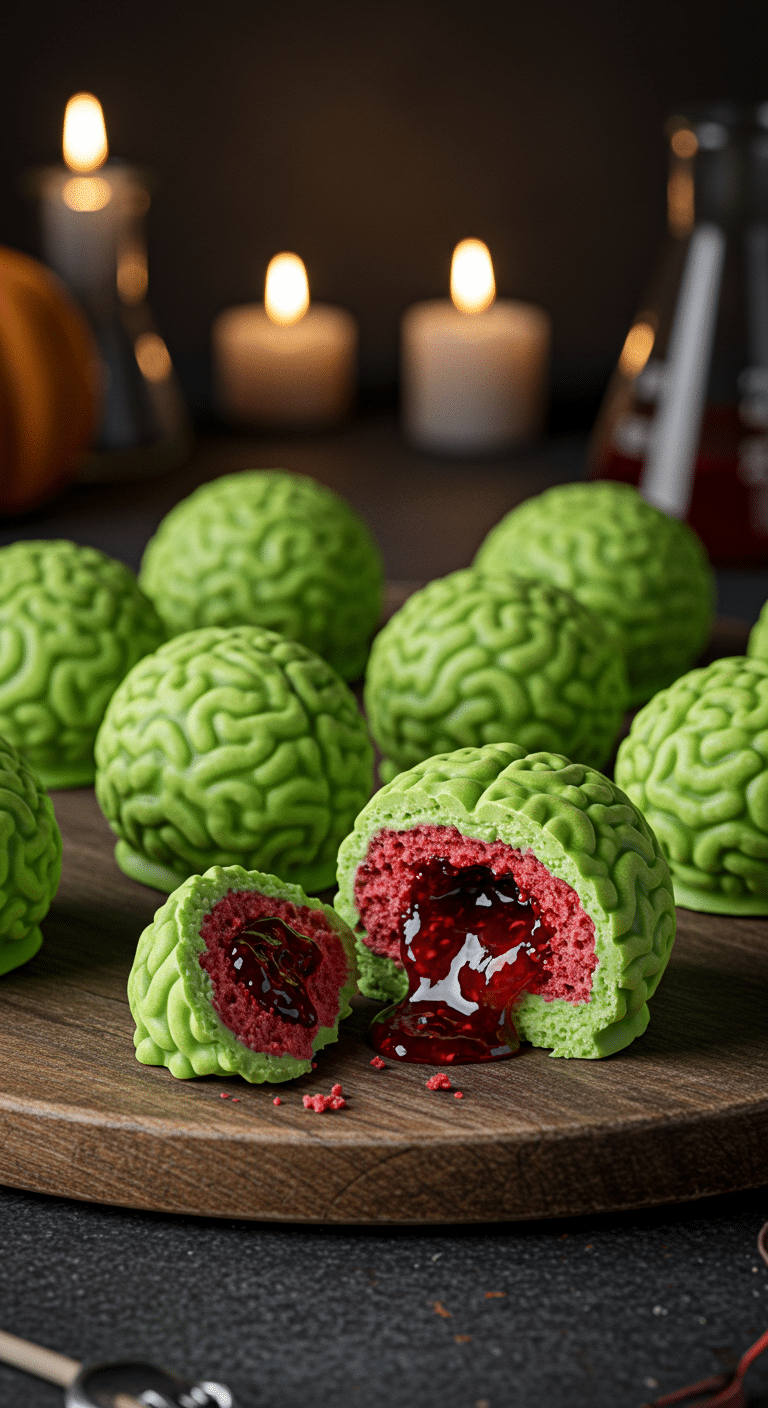
Are you ready to create the most ghoulishly gorgeous, spectacularly spooky, and unbelievably delicious treat for your next Halloween party? A candy so creative and gory, it will have all your guests gasping in delight? This incredible, from-scratch-tasting Cake Pop Brains recipe is the ultimate festive creation! We’re talking a sweet, colorful candy shell, shaped like a miniature, cartoon brain, filled with a rich, moist red velvet cake, and a surprise, gushing center of raspberry “blood.”
This isn’t just a recipe; it’s a guide to your new favorite edible Halloween project. We’ll show you how to use a few simple, store-bought ingredients and a fun silicone mold to create a stunning, from-scratch-tasting treat that is a guaranteed show-stopper. This is a satisfying and deeply delicious dessert that is as fun to make as it is to eat!
Table of Contents
Table of Contents
Recipe Overview: The Ultimate Spooky & Gory Halloween Treat
What makes these Cake Pop Brains so spectacularly fun is their incredible, detailed presentation and their delicious, multi-layered flavor and texture. This recipe is a masterpiece of edible, spooky art. The “brains” are created using a silicone mold and brightly colored candy melts to form a hollow shell. The real magic, however, is what’s inside. The shell is first filled with a surprise, gooey center of raspberry jam “blood.” This is then packed with a classic, rich, and moist cake pop filling, made from a combination of crumbled red velvet cake and vanilla frosting. Once sealed, these perfect little brains pop right out, ready to delight (and slightly disgust!) your guests.
| Metric | Time / Level |
| Total Time | 2 hours (includes setting) |
| Active Prep Time | 30 minutes |
| Difficulty Level | Easy |
| Servings | 8 “brains” |
The Mad Scientist’s Laboratory: The Essential Ingredients & Tools
This iconic party treat uses a handful of smart shortcuts and one key piece of equipment to create its signature spooky look.
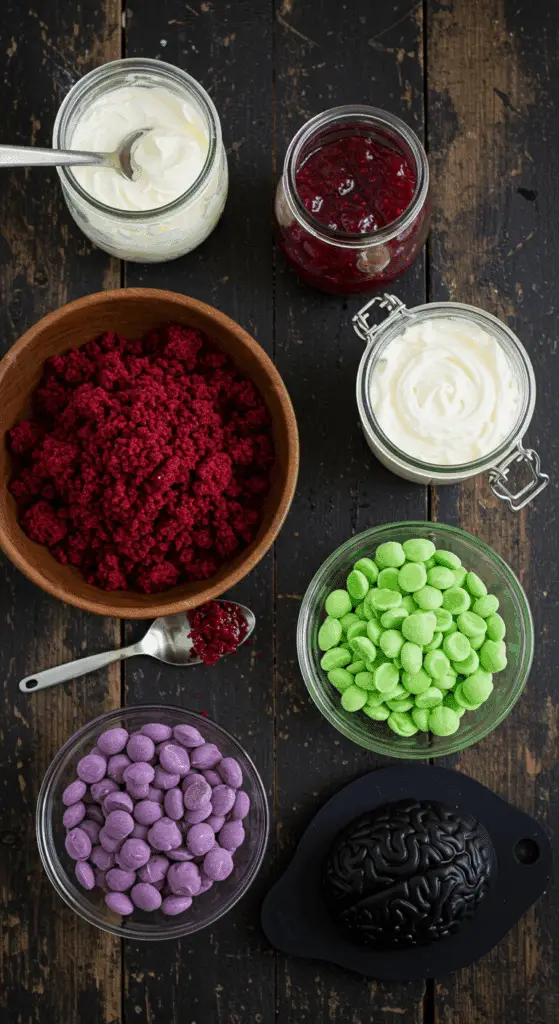
- The Cake Pop “Brain Matter”:
- Crumbled Red Velvet Cake: This is a fantastic and convenient shortcut! You can use leftover, unfrosted red velvet cake, or even a plain, store-bought red velvet loaf cake. The deep red color of the cake is the perfect, gory surprise for the inside of your brains!
- Vanilla Frosting: A simple, store-bought vanilla frosting is the perfect, easy “glue” that binds your cake crumbs together into a moist and delicious, moldable cake pop filling.
- The Candy Shell & “Blood”:
- Candy Melts: This is the key to an incredibly easy and impressive treat! Candy melts (or candy wafers) in a spooky color like lime green, purple, or orange are a type of confectionary coating that is specifically designed to melt beautifully and to set up with a hard, shiny finish with no complicated “tempering” required.
- Seedless Raspberry Jam: A high-quality, seedless raspberry jam is the perfect, easy “blood” for our surprise center. Its natural, deep red color and tart flavor are a fantastic contrast to the sweet cake and candy shell.
- The Key Equipment: A flexible, silicone brain-shaped mold is the essential tool for this recipe. You can easily find these online or in the seasonal section of most major craft stores, especially around Halloween.

Step-by-Step to the Best Halloween Brain Cake Pops
This fun and festive project is a joy to prepare.
Part 1: Prepare the Red Velvet “Brain Matter”
In the bowl of a stand mixer fitted with the paddle attachment, combine your 4 cups of crumbled red velvet cake and the 3 tablespoons of vanilla frosting. Beat on a medium speed until the mixture is smooth and holds together like a firm dough when you press it in your fingers. If it seems too dry, you can add more frosting, one teaspoon at a time. Set this aside.
Part 2: Create the Candy Shells
Step 1: In a double boiler (or a heatproof bowl set over a saucepan of simmering water), melt about two-thirds of your 8 ounces of candy melts, stirring, until they are almost completely smooth. Add the remaining candy melts and stir off the heat until everything is smooth.
Step 2 (The Fun Part!): Divide about two-thirds of your melted candy mixture among your eight silicone brain molds. Use a small, food-safe brush or the back of a small spoon to evenly coat the inside of each mold. Make sure the sides and the bottoms are well covered and that no part of the mold is showing through.
Step 3: Place the mold in the refrigerator for a few minutes to allow the candy shells to set and harden.
Part 3: Assemble Your Gory Brains and Unmold
Step 1: In a small bowl, combine your 1/2 cup of seedless raspberry jam with a few drops of red food coloring to intensify the “bloody” color. Step 2: When your candy shells have set, add a small spoonful of the raspberry jam “blood” into the bottom of each cavity. Step 3: Mold your prepared cake mixture into small balls and press one into each of the molds, on top of the jam. Use a sharp paring knife to shave the cake so that it is flush with the top of the molds. Step 4: Smooth your remaining melted candy mixture over the top to cover the cake completely and to seal the brains. Step 5: Let the brains set at room temperature for at least 40 minutes (or you can place them in the refrigerator for a few minutes for a faster setting).
Once the brains are completely firm, you can gently press them out of the flexible molds and serve.

Delicious Halloween Brain Cake Pops (An Easy Recipe!)
A festive and gory-themed recipe for ‘Cake Pop Brains,’ perfect for a Halloween party. This no-bake treat uses silicone brain molds to create the shape. An outer shell is made from colored candy melting wafers or ruby chocolate. This shell is then filled with a ‘bloody’ layer of red-tinted raspberry jam and a center of a classic cake pop mixture, made from crumbled red velvet cake and vanilla frosting. The brains are chilled to set and then unmolded for a spooky surprise.
Ingredients
- 4 cups crumbled red velvet cake
- 3 tablespoons vanilla frosting, plus more if needed
- 8 ounces lime green, purple, or orange candy melting wafers or ruby chocolate, finely chopped
- 1/2 cup seedless raspberry jam
- Red food coloring
- 1 to 2 teaspoons coconut oil or vegetable shortening (if needed)
Instructions
- Special Equipment: You will need eight 2-inch-wide silicone brain molds.
- Make the Cake Pop Filling: In a stand mixer, combine the crumbled cake and frosting. Beat on medium speed until the mixture is smooth and holds together when pressed. Set aside.
- Melt the Candy: Place about two-thirds of the candy melting wafers in a double boiler over simmering water. Heat, stirring, until almost completely melted. Remove from heat and stir in the remaining one-third of the wafers until the mixture is entirely smooth.
- Create the Shells: Divide about two-thirds of the melted candy mixture among the eight silicone brain molds. Use a small brush to evenly coat the inside of each mold completely. Refrigerate for a few minutes to set the shells.
- Prepare the ‘Blood’ Filling: In a small bowl, combine the raspberry jam with a few drops of red food coloring to intensify the color. Stir in a few drops of water if needed to make the jam fluid but not runny.
- Assemble the Brains: When the candy shells are set, divide the red jam among them. Mold the cake mixture into balls and press them firmly into the molds on top of the jam. Shave the cake mixture so it is flush with the top of the molds.
- Smooth the remaining melted candy mixture over the top to cover the cake and seal the brains. Let them set at room temperature for at least 40 minutes, or in the refrigerator for a few minutes.
- Gently press the finished brains out of the molds and serve.
Notes
- This is a no-bake recipe that relies on molding and chilling. Using pre-made, crumbled cake and frosting is a key shortcut.
- It is important to coat the inside of the silicone molds thoroughly with the melted candy to create a solid shell with no gaps.
- Do not refrigerate the candy shells for too long before filling, as they can become brittle and crack when you unmold them.
- The article references a ‘Cook’s Note’ that is not provided in the text.
Storage and Make-Ahead Tips
These Cake Pop Brains are the ultimate make-ahead party treat!
- Make-Ahead: You can prepare these festive treats up to 1 week in advance.
- Storage: Store the finished cake pop brains in a single layer in an airtight container in the refrigerator.
For more recipe follow my pinterest account
Frequently Asked Questions (FAQs)
Q1: What is the absolute, number one secret to making perfect, filled candies in a silicone mold?
The secret is to make sure your outer candy shell is thick enough and has no thin spots or holes. By using a small brush or the back of a spoon to “paint” the inside of the mold, you can ensure you have a nice, even coating. It’s a great idea to hold the mold up to the light to check for any thin spots before you chill it.
Q2: Can I make these Halloween cake pops ahead of time for a party?
Yes, absolutely! This is a perfect make-ahead treat. You can prepare the entire recipe up to a week in advance and keep them stored in an airtight container in the refrigerator until your party.
Q3: Can I use regular chocolate instead of candy melts?
You can, but it is much more challenging. For the best result with real chocolate, it would need to be tempered, which is a more advanced process of heating and cooling it to specific temperatures to ensure it sets up hard and shiny. Candy melts are a fantastic shortcut that will give you a perfect, sturdy, and shiny result with no tempering required.
Q4: Can I make this recipe with a different kind of cake?
Of course! This fun technique would also be fantastic with a classic dark chocolate cake for a different flavor, or even a vanilla cake that has been colored green for a spooky “zombie brain” twist.
Q5: Can I make this recipe without a stand mixer?
Yes! You can easily mix the cake pop filling by hand in a large bowl. Simply use your clean hands to crumble and knead the cake crumbs and the frosting together until they form a firm, dough-like consistency.

