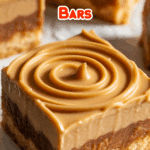
Peanut Butter Lunch Lady Cookie Bars (Nostalgic & Easy!)
Bake a batch of nostalgic Peanut Butter Lunch Lady Cookie Bars! This easy recipe creates soft, chewy peanut butter bars topped with a simple sweet glaze. A true comfort treat!
Ingredients
(Based on 1x column)
Peanut Butter Cookie Bars:
- ▢ 1 cup (2 sticks) unsalted butter, softened to room temperature
- ▢ 1 cup granulated sugar
- ▢ 1 cup packed brown sugar
- ▢ 1 cup creamy peanut butter
- ▢ 2 large eggs, at room temperature
- ▢ 2 ½ teaspoons vanilla extract
- ▢ 1 ½ cups all-purpose flour
- ▢ 1 teaspoon baking powder
- ▢ ½ teaspoon salt
Simple Glaze:
- ▢ 1 cup powdered sugar, sifted
- ▢ 2-3 tablespoons milk (or cream)
- ▢ ½ teaspoon vanilla extract (Note: Recipe instructions imply vanilla is in glaze, ingredient list had it separate. Adding it clearly to glaze components based on instructions)
Instructions
1. Prepare Oven and Baking Pan:
- Preheat your oven to 350°F (175°C).
- Line an 8×8-inch baking pan with parchment paper, leaving an overhang on two opposite sides to use as handles later. Alternatively, grease the pan thoroughly. Set aside.
2. Cream Butter, Sugars, and Peanut Butter:
- Ensure your butter is properly softened to room temperature.
- In a large mixing bowl, using an electric mixer (handheld or stand mixer with the paddle attachment), cream together the softened unsalted butter, granulated sugar, and packed brown sugar on medium-high speed.
- Beat for about 3-4 minutes, until the mixture is light in color and fluffy. Scrape down the sides of the bowl as needed.
- Add the creamy peanut butter to the bowl and mix on medium speed until completely smooth and well combined with the butter-sugar mixture.
3. Add Eggs and Vanilla:
- Add the room temperature large eggs one at a time, beating well on medium speed after each addition until fully incorporated.
- Stir in the 2 ½ teaspoons of vanilla extract.
4. Combine Dry Ingredients and Finish Dough:
- In a separate medium bowl, whisk together the all-purpose flour, baking powder, and salt until well combined.
- Gradually add this dry ingredient mixture to the wet peanut butter mixture in the large bowl.
- Mix on low speed (or by hand with a spatula) just until the flour is combined and no large streaks remain. Be very careful not to overmix the dough at this stage, as this can result in tough bars.
5. Spread Dough in Pan and Bake:
- Transfer the prepared peanut butter cookie dough to the prepared 8×8-inch baking pan.
- The dough will be soft. Use a spatula (lightly greased if dough is sticky) or your clean fingertips to spread the dough evenly into the pan.
- Place the pan in the preheated oven.
- Bake for 20-25 minutes. The bars are done when the edges are golden brown and a toothpick inserted into the center comes out clean or with a few moist crumbs attached. The center should feel set to the touch.
6. Cool Completely:
- Remove the pan from the oven and place it on a wire cooling rack.
- Let the peanut butter cookie bars cool completely in the pan before attempting to glaze or slice them. This is very important for them to set properly and for the glaze not to melt. Cooling can take 1-2 hours.
7. Make and Apply Glaze:
- Once the bars are completely cool, prepare the simple glaze.
- In a small bowl, whisk together the sifted powdered sugar, 2 tablespoons of milk (or cream), and the ½ teaspoon of vanilla extract until smooth.
- If the glaze is too thick for your liking, add more milk, just ½ teaspoon at a time, whisking until it reaches your desired drizzling or spreading consistency. If it becomes too thin, whisk in a bit more sifted powdered sugar.
- Drizzle or spread the glaze evenly over the top of the cooled peanut butter cookie bars.
8. Set Glaze and Serve:
- Let the glaze sit and set for about 15-20 minutes before slicing the bars.
- If you used the parchment paper sling, carefully lift the entire block of glazed bars out of the pan onto a cutting board.
- Use a sharp knife to cut into squares or rectangles.
- Serve and enjoy these nostalgic treats!
